In this video I discuss the 7 step process we use to rent out, find and pick the best quality tenants. This step by step guide is great for beginners and experienced landlords looking to rent out your rental property. I show you tips for taking quality pictures and video, how to write your ad copy to maximize your rental advertisement. How to set up and coordinate rental property showings. What to do after you have shown prospective renters/tenants the apartment/house. Tips for how to properly screen tenants, do not skip that step! Then the process we use to approve the best tenants, including step by step right to handing the tenants the keys. This is the complete guide to renting your investment property.
Watch the video or read the blog post below.
Whether renting out your house for the first time or even if you have found a tenant before, this step by step guide will show you how to rent your property out properly, just like the pros.
We rent out alot of properties within a year. In 2019 we averaged renting out 5-7 investment properties per month.
When you rent out that many properties you must develop a system to make your efforts efficient.
That being said, I am going to show you our system of renting out properties.
You can use this system to make your renting efforts more efficient.
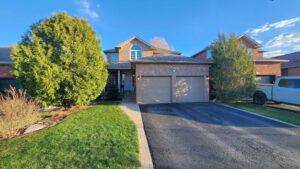
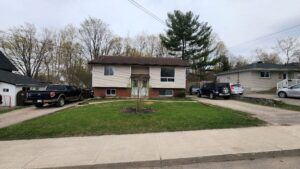
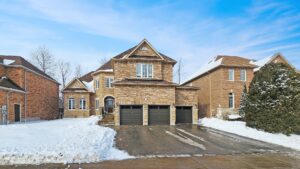
- Pictures –
This is a critical step. If you want to attract good quality renters you have to have an appealing advertisement.
Even more important than the ad copy is the pictures. Here are a few tricks we use when taking pictures:
- If using your phone, take the picture in landscape mode, NOT portrait. Portrait pictures might be great for your Instagram story but for advertisements people want to see more.
- Use wide angle lens or wide angle mode on phone (if available). Much to our first tip, people want to see more, they don’t want to guess on the layout of the property
- Quickly edit your pictures. If you have dark pictures, maybe the lighting wasn’t the best, so open up the picture in a photo editing software and lighten things up. This will make a huge difference when people are scrolling through the pictures
- Put them in order. When making the advertisement, put the pictures in order of how you would walk through the rental unit. Make it easy for people to understand the layout
Video –
This is becoming more and more important. People respond more to video than just pictures. We also like doing video because it further qualifies our inquiries. We may get less people inquiring but that’s the goal, if you can believe it. We want to attract qualified renters and if they can establish that the property doesn’t have a main floor powder room and that’s a must for them from watching out virtual video walk thru, ideally they will figure that out from watching our video and will then not waste ours or their time scheduling a showing.
2. Write and create the Ad.
Ad copy –
The description you write needs to include the following information.
Location
Proximity to amenities
2 – 5 reasons why someone would want to rent the propert
How much
What does monthly rent include, what does it not include (utilities, etc.)
How you want them to go about getting more info/ scheduling a showing
3. Post your ad –
Post to all available websites or platforms
4. Showings
Plan your showings –
We always have pre set showing times and try and get as many people as we can to come to a showing time.
I would recommend the same for you, give a few options of when potential tenants can see you’re rental unit. This will save you so much time going back and forth scheduling times for people to see the property, and you can put the showings in you’re calendar and plan accordingly.
Pre-Qualify
When you get inquires, pre-qualify. We realize you can only go so far with pre-qualification but this can save so much time. The most basic example I can think of is if you don’t want any pets at your house, simply ask if they have a pet before you show them. If they say yes, then don’t waste your time.
Doing the Showings –
Finally the showings. Hopefully you have a few interested people that want to see your rental unit. Turn the lights on, make the place look nice and be available for any questions.
4. Follow up –
I can pretty much guarantee that most people will ask you how they can apply or what they need to do to move in.
Make it easy for them, send a follow up email to everyone. Ask for feedback and provide detailed instructions for how they can apply.
5. Screening –
This is probably the most important step! It’s so easy to not screen and go off your gut feelings. DO NOT go off a gut feeling. Do your homework. I can tell you so many times where I thought the prospects would make great tenants, until I reviewed their application. It is so difficult to evict tenants in Ontario that making a silly mistake like not screening your tenant prospects can cost you so much money and time. This is the make or break step in renting your property out. It’s not worth the risk to save 30 minutes or however long it will take you to complete this step. You need to gather information to determine if the applicant can afford to live there, has decent credit (which is an indication they care and will make their rent payments) and a reference from a previous landlord and employer is also encouraged. We do even more than that but that should be the minimum. Do your homework, it’s worth it, trust me! Failure to complete this step of the process could cost you BIG time.
6. Approve –
Amazing, you have found a great tenant. Now it’s time to collect the deposit. In Ontario we collect the last month’s rent and hold that as the deposit. We don’t consider a rental unit rented until we have received the deposit. Once you have the deposit it’s time to sign the lease. In Ontario we now have a standard Ontario lease. The residential lease is standard and the same for all residential tenancies which is nice really as it makes it really easy for you to do it right and within the rules of the LTB (Landlord Tenant Board).
7. Sign the Lease
Utilities and insurance –
If you are renting out your property plus utilities, you will want to see proof that the utilities have been set up in your new tenants name. You will also want to verify and confirm that the tenant has set up a tenant insurance policy. Get confirmation that this has been completed BEFORE providing the keys.
Once you have confirmed all utilities are set up and they have shown proof of their insurance policy it’s time for the last step.
Collect first month’s rent and hand over the keys.
You are done and if you followed the steps in this guide you will have rented your property out just like the pros.
Fuse Property Management (www.fusepm.ca) does lease only for those who would rather have the pros do it. We can also manage the entire process. From renting, to collecting monthly rent and coordinating any maintenance.